Introduction
A dedicated XML-based language is used to define the rules needed to parse the Finite Element Model file format. The approach can be used with multiple formats and codes and has been successfully tested against LS-dyna and Pamcrash models. It was selected because it allows the user to implement additional rules for other codes or numerical features without recompiling the software. This is an alternative to a full templates (the only required rules are those needed to build the PIPER model for a given transformation).
Format rule file : in this file (xml based with extension .pfr), general information and rules to parse the finite element format are defined. In the release, rule format files are provided for LS dyna (for both fixed sized and comma separated format) and Pamcrash. The files (with a pfr extension) are stored in the Piper/bin directory. In principle, it is possible to define Format rules file for other finite element formats and use them in the PIPER application as long as:
- the finite format is keyword based
- each component is identified by a id and/or a name.
This section describes how to define rules to add support for additional keywords in the provided files, or to develop new files for another Finite Element format.
Note: this rule file is not specific to a finite element Human Body Model. If a rule file already exists for the finite element format used by your HBM, it is likely not needed to modify it even if you develop new metadata.
Format rule file
The format rule file define rules to parse keywords for a specific Finite Element format. The xml file is organized under the root element "format_description" as follows:
Description of the general structure of the parser file (Text between <– and –> is comment):
1 <--
XML declaration -->
2 <?
xml version=
"1.0" encoding=
"UTF-8"?>
3 <!
DOCTYPE format_description SYSTEM "ParsingRules.dtd">
5 <--
Root element of the parser document -->
7 <--
formatInformation element of the parser document: Repetition 1 -->
8 <--
This element declares some basic information on the format -->
9 <
formatInformation format=
"FormatName">
13 <--
meshComponent element of the parser document: Repetition 1 -->
14 <--
This element declares association between keyword and PIPER component -->
20 <--
rule element of the parser document: Repetition once per keyword to parse -->
The two first lines are mandatory. The first one is requested for the XML format and the second one allows to check the syntax in the parser file.
"formatInformation" element
The formatInformation element has an attribute used to declare a name describing the format (mandatory) and is composed of:
- "comment" element: the character used in the FE format for comment line. Multiple characters can be defined (separated by whitespace).
- "include" element: the keyword used to declare include files in the FE format.
- "separator" element: the character used as a separator. If a whitespace is used as a separator in the FE format, it should be declared using "ws".
Example of formatInformation element for Pamcrash. In this format, two different characters can be placed at the beginning of comment line.
1 <
formatInformation format=
"PamCrash">
3 <
include>
INCLU</
include>
Example of formatInformation element for LS-Dyna using comma as separator.
1 <
formatInformation format=
"LSDyna_separator">
3 <
include>*
INCLUDE</
include>
4 <
separator>,</
separator>
"meshComponent" element
The meshComponent element defines relation between keywords of the FE format and a PIPER component. For each keyword defined in this element, a "rule" element must be defined.
Components defined in this element are:
- "componentNode" element: Piper node
- "componentElement1D" element: Piper one-dimensional element
- "componentElement2D" element: Piper two-dimensional element
- "componentElement3D" element: Piper three-dimensional element
- "componentGNode" element: Piper group of nodes
- "componentGElement1D" element: Piper group of one-dimensional element
- "componentGElement2D" element: Piper group of two-dimensional element
- "componentGElement3D" element: Piper group of three-dimensional element
- "componentGGroup" element: Piper group of group
- "componentFrame" element: Piper Frame
- "componentModelParameter" element: Piper parameter
In addition, the element ordering has to be specified in case the one in the considered FE format differs from the one chosen in Piper project (VTK definition adopted VTK documentation (http://www.vtk.org/wp-content/uploads/2015/04/file-formats.pdf)).
elementOrdering element can be used for this purpose. It describes the sequence ordering used to convert FE element definition to the Piper one for the following types:
- tri: triangle element (2D)
- quad: quadrangle element (2D)
- tetra: tetra element (3D)
- pyra: pyramidal element (3D)
- penta: wedge element (3D)
- hexa: hexahedron element (3D)
Example of meshComponent element:
2 <
componentNode>
kw kw</
componentNode>
3 <
componentElement1D>
kw kw</
componentElement1D>
4 <
componentElement2D>
kw kw</
componentElement2D>
5 <
componentElement3D>
kw kw</
componentElement3D>
6 <
componentGNode>
kw kw</
componentGNode>
7 <
componentGElement1D>
kw kw</
componentGElement1D>
8 <
componentGElement2D>
kw kw</
componentGElement2D>
9 <
componentGElement3D>
kw kw</
componentGElement3D>
10 <
componentGGroup>
kw kw</
componentGGroup>
11 <
componentFrame>
kw kw</
componentFrame>
12 <
componentModelParameter>
kw kw</
componentModelParameter>
Example of meshComponent element for Pamcrash © format:
2 <
componentNode>
NODE</
componentNode>
3 <
componentElement1D>
BEAM SPRING/</
componentElement1D>
4 <
componentElement2D>
SHELL</
componentElement2D>
5 <
componentElement3D>
SOLID</
componentElement3D>
6 <
componentGNode>
GROUP</
componentGNode>
7 <
componentGElement1D>
GROUP</
componentGElement1D>
8 <
componentGElement2D>
GROUP</
componentGElement2D>
9 <
componentGElement3D>
GROUP</
componentGElement3D>
10 <
componentGGroup>
GROUP</
componentGGroup>
11 <
componentFrame>
FRAME</
componentFrame>
12 <
componentModelParameter>
MATER PART</
componentModelParameter>
14 <
penta>1 2 5 4 3 6</
penta>
Example of meshComponent element for LS-DYNA © format:
2 <
componentNode>*
NODE</
componentNode>
3 <
componentElement1D>*
ELEMENT_BEAM *
ELEMENT_DISCRETE</
componentElement1D>
4 <
componentElement2D>*
ELEMENT_SHELL *
ELEMENT_SHELL_THICKNESS *
ELEMENT_SHELL_BETA</
componentElement2D>
5 <
componentElement3D>*
ELEMENT_SOLID</
componentElement3D>
6 <
componentGNode>*
SET_NODE_LIST_TITLE *
PART</
componentGNode>
7 <
componentGElement1D>*
SET_BEAM_TITLE *
PART</
componentGElement1D>
8 <
componentGElement2D>*
SET_SHELL_LIST_TITLE *
PART *
SET_SHELL_LIST</
componentGElement2D>
9 <
componentGElement3D>*
SET_SOLID_TITLE *
PART</
componentGElement3D>
10 <
componentGGroup>*
SET_PART_LIST_TITLE *
PART</
componentGGroup>
11 <
componentFrame>*
DEFINE_COORDINATE_NODES *
DEFINE_COORDINATE_SYSTEM_TITLE *
DEFINE_COORDINATE_NODES_TITLE</
componentFrame>
12 <
componentModelParameter>*
MAT_ELASTIC_TITLE *
MAT_PLASTIC_KINEMATIC_TITLE *
MAT_STRAIN_RATE_DEPENDENT_PLASTICITY_TITLE *
ELEMENT_SHELL_THICKNESS *
ELEMENT_SHELL_BETA</
componentModelParameter>
14 <
penta>1 2 5 4 3 6</
penta>
"rule" element
The "rule" element is used to define all operations to be performed when a previously registered keyword is found. For each keyword registered in "meshComponent" element, parsing actions are defined and parsed data are stored in variables (Variable manipulation). These variables are used to create and manipulate PIPER components of the model with PIPER Component operation.
Define rules
Variable manipulation
The element "variableAssign" is used to assign the result of an operation to the variable identified by name. The element "variable" defines variable as an input of another element.
Usage of "variableAssign" and "variable" elements:
1 <
variableAssign name=
"varname"/>
3 <
variable name=
"varname"/>
The "append" element allows to add characters defined in value to a variable of type character.
Example of "append" usage:
2 <
variable name=
"GroupName"/>
3 <
variableAssign name=
"GroupName_Node"/>
the "clearVar" element clear variable(s).
Example of "clearVar" usage:
2 <
variable name=
"GroupName_Node"/>
3 <
variable name=
"GroupName_E1D"/>
Parsing operations
"nextLine"" element
This elements go to the next line of the current line (without considering comment line according to comment character defined in`"formatInformation" element).
"parse"" element
This element defines how to (1) parse the current line or variable of type character and (2) assign the result to a variable.
Options of the "parse" element:
-
format: Type of data to be parsed. It can be C (characters), F (double), UI (integer), UIpos (strictly positive integer).
-
offset: Offset in digit if no separator is defined either in parse element or “formatinformation” element. Number of separator if a separator is defined either in parse element or “formatinformation” element.
-
length: Number of digit to parse. It must be zero if a separator is defined
-
separator: Defines a local separator character specific to this parse element. Default is no local separator defined. If length equals 0 and a global separator is defined in "formatInformation" element, the global separator is used for parsing if no local separator is defined.
-
repeat: repeat the parse operation considering the offsetrepeat. The result of parsing is accumulated in the variable as a vector.
-
offsetrepeat: Offset in digit between repeated parse operations in case no separator is defined neither in parse element nor in "formatInformation" element . Default value is 0 if length is different from 0 and 1 if length equals 0.
Or Number of separator between repeated parse operations if a separator is defined either in parse element or "formatInformation" element element.
Example 1: Parse in fixed length format.
String to parse (blanks are replaced by dot for visibility and parsed values are in bold)
…….1.5……0.06……..-2………0
1 <
parse format=
"F" separator=
"none" repeat=
"1" offset=
"10" length=
"10">
2 <
variableAssign name=
"var1"/>
As a result, the value 0.06 is assigned to the variable var1 type F.
Example 2: Parse with comma separator.
String to parse (parsed values are in bold)
1.5,0.06,-2,0
- If the separator for this line is different from the separator defined in "formatInformation" element element:
1 <
parse format=
"F" separator=
"," repeat=
"1" offset=
"1" length=
"0">
2 <
variableAssign name=
"var1"/>
- Otherwise:
1 <
parse format=
"F" repeat=
"1" offset=
"1" length=
"0">
2 <
variableAssign name=
"var1"/>
Example 3: Parse in fixed length format with repetition.
String to parse (blanks are replaced by dot for visiblity and parsed values are in bold)
.7020553……..0.546867……-93.736504………14.2672
1 <
parse format=
"F" separator=
"none" repeat=
"3" offset=
"8" length=
"16">
2 <
variableAssign name=
"var1"/>
The result is stored in var1 and var1 is a vector of 3 double numbers (0.546867,-93.736504,14.2672).
Example 4: Same as example 3 with comma separator.
String to parse (parsed values are in bold)
7020553,0.546867,-93.736504,14.2672
1 <
parse format=
"F" separator=
"none" repeat=
"3" offset=
"1" length=
"0">
2 <
variableAssign name=
"var1"/>
The result is stored in var1 and var1 is a vector of 3 double numbers (0.546867,-93.736504,14.2672).
"parserule" element
This element is used to describe "parse"" element to be performed on the current line or variable of type character.
Example of a set of two parse actions on the current line:
line to parse (blanks are replaced by dot for visiblity)
.7020553……..0.546867……-93.736504………14.2672
3 <
parse format=
"UI" separator=
"none" repeat=
"1" offset=
"0" length=
"8">
4 <
variableAssign name=
"var1"/>
6 <
parse format=
"F" separator=
"none" repeat=
"2" offset=
"24" length=
"16">
7 <
variableAssign name=
"var2"/>
As a result, value 7020553 is assigned to variable var1 and var2 is a vector with two elements (-93.736504,14.2672).
Example of a set of two parse actions on variable varstr (this variable must be a variable of type C):
Content of variable varstr to parse (blanks are replaced by dot for visiblity)
.string_1……..string_2……-93.736504………14.2672
2 <
variable name=
"varstr"/>
3 <
parse format=
"UI" separator=
"none" repeat=
"1" offset=
"0" length=
"8">
4 <
variableAssign name=
"var1"/>
6 <
parse format=
"F" separator=
"none" repeat=
"2" offset=
"24" length=
"16">
7 <
variableAssign name=
"var2"/>
As a result, string_2 is assigned to variable var1 and var2 is a vector with two elements (-93.736504,14.2672).
Conditional Statement
"doIf" statement
The “if” statement is used for conditional execution:
3 <--
expression of the condition: see Boolean operation->
7 <--
expressions in body are executed if condition is true->
"while" statement
The “while” statement is used to repeat execution as long as the condition is true:
3 <--
expression of the condition: see Boolean operation->
7 <--
expressions in body are executed if condition is true->
"forEach" statement
The “forEach” statement is used to iterate over elements of a vector variable:
2 <--
variable name to iterate on->
3 <
variable name=
"iterable_variable"/>
4 <--
variable name of the iterator->
5 <
variableAssign name=
"iterator_variable"/>
7 <--
expression of the condition: see Boolean operation->
11 <--
expressions in body are executed if condition is true->
Boolean Operation
The following set of operations return a Boolean depending on the result of the evaluation.
"find" operation
This operation returns true if the set of characters defined in “value” is found either in the variable (variable must be a variable of type C) or in the current line being parsed. The option pos is used to specify if “value” can be at any position (pos="any") in the variable or only at the beginning (pos=”start”).
1 <--
true if value “str” is found at the beginning of the current parsed line->
2 <
find value=
"str" pos=
"start"><
curLine/></
find>
4 <--
true if value “str” is found at any position in the variable varname->
5 <
find value=
"str" pos=
"any"><
variable name=
"varname"/></
find>
"notfind" operation
This operation returns true if the set of characters defined in “value” is not found either in the variable nor in the current line being parsed. Syntax and options are the same as for the “find” operation.
1 <--
true if value “str” is not found at the beginning of the current parsed line->
2 <
notfind value=
"str" pos=
"start"><
curLine/></
notfind >
4 <--
true if value “str” is not found at any position in the variable varname->
5 <
notfind value=
" str " pos=
"any"><
variable name=
"varname"/></
notfind >
"equal" operation
This operation returns true if the set of characters "str" defined in value is equal to the current line being parsed or to the variable "varname" of type character.
1 <--
true if value “str” is equal to the current parsed line->
2 <
equal value=
"str"><
curLine/></
equal >
4 <--
true if value “str” is to the variable varname->
5 <
equal value=
" str "><
variable name=
"varname"/></
equal >
Utilities operation
Utilities operations correspond to operations that can help to manipulate data stored in variables.
"generateId" operation
the "generateId" element generates an id comprised between a start and an end value stored in variables of type UI and store the result in a variable (vector of UI).
2 <
start><
variable name=
"startvalue"/></
start>
3 <
end><
variable name=
"endvalue"/></
end>
4 <
variableAssign name=
"block_id"/>
PIPER Component operation
This section is related to the operations that can be performed on a PIPER component. Each PIPER component created during the parsing of files can be identified by its Id (or name) and the keyword defined in keyword defined in the "rule" element element used to create it. For each PIPER component, methods are available to create it and assign to it parsed data stored in variables.
Model File assignement
The "objectModelFile" element defines a FE model file to be parsed. It includes only one methode element: "setFile".
2 <
setFile><
variable name=
"varname"/></
setFile>
Piper Node operation
The "objectNode" element adds a node in the Piper model. It includes two methods:
- "setId": creates a new node or activates one.
- "setCoord": sets coord for the active node. The variable use to assign coord must be a vector of three double.
2 <
setId><
variable name=
"varnameforId"/></
setId>
3 <
setCoord><
variable name=
"varnameforcoord"/></
setCoord>
Example of "objectNode" element usage: line that defined node in Pam-Crash format (blanks are replaced by dot for visiblity) NODE../..7020551.......-0.869206......-92.601196.........9.03719
3 <
parse format=
"UIpos" length=
"8" offset=
"8" repeat=
"1" separator=
"none"><
variableAssign name=
"NodeId"/></
parse>
4 <
parse format=
"F" length=
"16" repeat=
"3" offset=
"16" separator=
"none"><
variableAssign name=
"coord"/></
parse>
7 <
setId><
variable name=
"NodeId"/></
setId>
8 <
setCoord><
variable name=
"coord"/></
setCoord>
Piper Element operation
"objectElement1D", "objectElement2D" and "objectElement3D" elements respectively add one-dimensional, two-dimensional and three-dimensional elements in the Piper model. It includes two methods:
- "setId": creates a new Piper element or activates one.
- "setElemDef": sets the element definition for the active element. The variable use to assign coord must be a vector owhich dimension depends of element type.
One-dimensional element:
2 <
setId><
variable name=
"varnameforId"/></
setId>
3 <
setElemDef><
variable name=
"varnameforelementdef"/></
setElemDef>
Two-dimensional element:
2 <
setId><
variable name=
"varnameforId"/></
setId>
3 <
setElemDef><
variable name=
"varnameforelementdef"/></
setElemDef>
Three-dimensional element:
2 <
setId><
variable name=
"varnameforId"/></
setId>
3 <
setElemDef><
variable name=
"varnameforelementdef"/></
setElemDef>
Piper Group operation
This element defines the group in PIPER model and adds content to it. type: defines type of group content (Node, Element3D, Element2D, Element1D, Group)
- "setId": creates a new Piper group or activates an already created one.
- "setName": sets a name group.
- "setPart": true/false, true to indicate that this group is a part of the finite element model
- "addInGroup": sets group content in the active group.
Example of group of three-dimensional elements:
1 <
objectGroup type=
"Element3D">
2 <
setId><
variable name=
"varnameforId"/></
setId>
3 <
addInGroup><
variable name=
"varnameforelementId"/></
addInGroup>
In this example, Id stored in variable "varnameforelementId" corresponds to Id associated with one of the keywords associated in "meshComponent" element with Piper component declared in type of the "objectGroup" element (Element3D in the example). If Id added is associated with another keyword(s), these keywords can be specified in the "sourceId" element as in the following example. In the example, Id of groups are added in a Group of group PIPER component and Id of group(s) to be added are associated with keywords defined in the "sourceId" element.
Example of group of group using sourceId:
1 <
objectGroup type=
"Group">
2 <
setId><
variable name=
"varnameforgroupId"/></
setId>
4 <
sourceId>
kw1 kw2 kw3</
sourceId>
5 <
variable name=
"GGroupId"/>
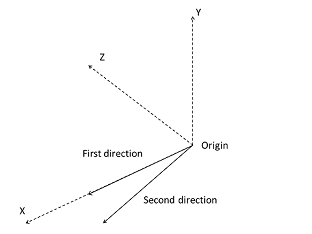
PIPER Frame operation
The "objectFrame" element adds a frame definition in the PIPER model. Methods of the "objectFrame" element are:
- "setId": creates a new Frame or activates an already created one.
- "setName": sets a name frame.
- "setOrigin": sets the origin (node Id).
- "setFirstDirection": sets the first direction (X, Y or Z).
- "setFirstAxis": sets the node id that defined the first axis.
- "setSecondDirection": sets the second direction (X, Y or Z).
- "setPlane": sets the node id to define the plane local x-y
Frame Definition
Example of "objectFrame" element usage:
2 <
setId><
variable name=
"FrameId"/></
setId>
3 <
setName><
variable name=
"FrameName"/></
setName>
4 <
setOrigin type=
"coord"><
variable name=
"Org"/></
setOrigin>
5 <
setFirstDirection>
X</
setFirstDirection>
6 <
setFirstAxis type=
"coord"><
variable name=
"First"/></
setFirstAxis>
7 <
setSecondDirection>
Y</
setSecondDirection>
8 <
setPlane type=
"coord"><
variable name=
"Second"/></
setPlane>
PIPER Joint operation (obsolete: not needed )
The "objectJoint" element adds a joint definition in the PIPER model. Revolute and Spherical joints are the allowed type of joint. Methods of the "objectJoint" element are:
- "setId": creates a new joint or activates an already created one.
- "setType": sets the type of the joint (REVOLUTE or SPHERICAL).
- "setCenter": sets the center of the joint (nodeId).
- "setAxis": sets a second node Id to define the axis of the REVOLUTE joint.
- "setDof": sets the Degrees of Freedom of the joint. six boolean values (TX,TY,TZ, RX, RY,RZ with O: blocked; 1: free). Default for SPHERICAL joint (0 0 0 1 1 1). Default for REVOLUTE joint (0 0 0 1 0 0).
Example of "objectJoint" element usage (REVOLUTE joint):
2 <
setId><
variable name=
"JointId"/></
setId>
3 <
setType>
REVOLUTE</
setType>
4 <
setCenter><
variable name=
"JointAxis1"/></
setCenter>
5 <
setAxis><
variable name=
"JointAxis2"/></
setAxis>
6 <
setDof>0 0 0 0 1 0</
setDof>
PIPER Parameter operation
The "objectParameter" element adds a parameter definition in the Piper model. A parameter allows to associate a parameter name with a value parsed in the file. Methods of the "objectParameter" element are:
- "setId": creates a new parameter or activates an already created one.
- "setValue": sets the value for a parameter with two members elements:
- "type": sets the parameter name.
- "value": sets the value of the parameter.
Example of "objectParameter" element usage:
2 <
setId><
variable name=
"PropId"/></
setId>
4 <
type>
ParameterName</
type>
5 <
value><
variable name=
"ValueVar"/></
value>
 1.8.10
